Hole-Free Short Rows: A Little Tutorial
So if you've been here for a while, or if you've plowed through the archives, you might know that I used to have a big problem with holes in my short row toes and heels. Big holes. Gaping, ugly holes.
But no more!
Several people have emailed or commented and asked how I got over the hole problem, and I emailed them back, but realized that it might be easier to see what I'm talking about with pictures, so I made Marc take 186 pictures of me knitting and threw together a little tutorial.
First, three disclaimers.
a) I have no idea if what I'm doing here is "right"-but it works for me. Your mileage may vary.
b) This may be old news to many of you, in which case roll your eyes and go about your business--but I'm still such a newbie knitter, even after 4 years or so, that I need little tips and techniques like this, and I hope it's helpful to other people like me.
c) This is not a tutorial on wrapped short-rowing in general. For that, see Nona's excellent tutorial, Wendy's toe-up sock pattern, and many, many other sources. I'm just going to tell you what I do when I get to the wraps. Which is this.
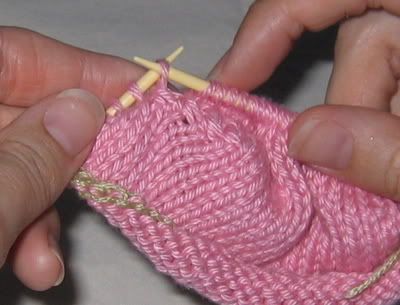
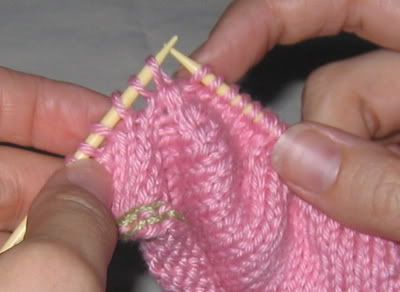
1. Knit until you hit the wrapped stitch you want to work:

2. Slip the wrapped stitch to the right needle:
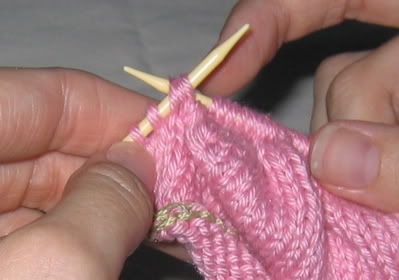
3. Use the LEFT needle to enter the two wraps from the LEFT:
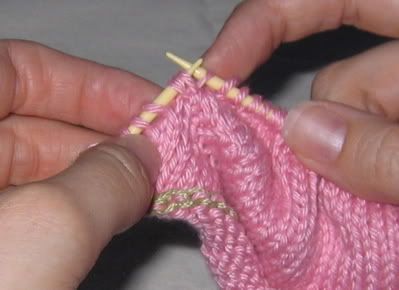
4. Slip the wraps onto the right needle. All three stitches--the original stitch and two wraps--are now on the right needle:
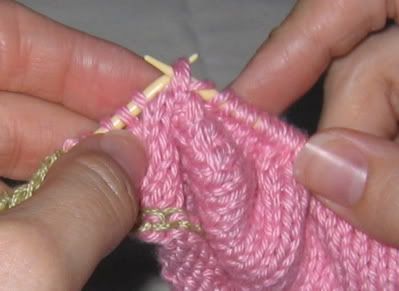
5. Use the tip of the left needle to tease the original stitch out from under the wraps:
6. Replace the two wraps on the left needle: the three stitches should now be stitting separately:
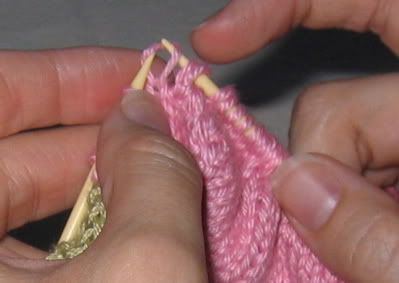
7. Knit the three stitches together through their BACK loops:
8. Admire your neat decrease:

For the purl side, same deal, but purl normally, through the front loops.
This looks like a lot of annoying steps (Marc: "How do you remember all of that?" Me: "Because I'm a GENIUS, honey, that's how."), but it's really quite fluid once you get going. It does take a bit more time than just picking up the wraps with the right needle and K3-ing, but I think the finished effect is worth a little extra time. Because, you know--no holes.
Questions? Suggestions? Inprovements? Lay it on me.
But no more!
Several people have emailed or commented and asked how I got over the hole problem, and I emailed them back, but realized that it might be easier to see what I'm talking about with pictures, so I made Marc take 186 pictures of me knitting and threw together a little tutorial.
First, three disclaimers.
a) I have no idea if what I'm doing here is "right"-but it works for me. Your mileage may vary.
b) This may be old news to many of you, in which case roll your eyes and go about your business--but I'm still such a newbie knitter, even after 4 years or so, that I need little tips and techniques like this, and I hope it's helpful to other people like me.
c) This is not a tutorial on wrapped short-rowing in general. For that, see Nona's excellent tutorial, Wendy's toe-up sock pattern, and many, many other sources. I'm just going to tell you what I do when I get to the wraps. Which is this.
1. Knit until you hit the wrapped stitch you want to work:
2. Slip the wrapped stitch to the right needle:
3. Use the LEFT needle to enter the two wraps from the LEFT:
4. Slip the wraps onto the right needle. All three stitches--the original stitch and two wraps--are now on the right needle:
5. Use the tip of the left needle to tease the original stitch out from under the wraps:
6. Replace the two wraps on the left needle: the three stitches should now be stitting separately:
7. Knit the three stitches together through their BACK loops:
8. Admire your neat decrease:
For the purl side, same deal, but purl normally, through the front loops.
This looks like a lot of annoying steps (Marc: "How do you remember all of that?" Me: "Because I'm a GENIUS, honey, that's how."), but it's really quite fluid once you get going. It does take a bit more time than just picking up the wraps with the right needle and K3-ing, but I think the finished effect is worth a little extra time. Because, you know--no holes.
Questions? Suggestions? Inprovements? Lay it on me.
posted by Ashley at 3:49 PM
![]()

13 Comments:
Now I get it--the trick is to knit through the BACK of the loops...
Thanks for the tips!
I don't know where I first came across it, but I read something very early in my knitting career that instructed me to twist my stitches when I increased. It was one of those "aha" moments that made all the difference in my knitting. There's something very satisfying about those moments.
Great tutorial! I don't knit socks so I have no clue if it's "right", but the pictures and description are fab!
That is one *very* neat decrease. I will have to try it -- once I master the basic idea of short rows, that is...
Great tutorial...I have no doubt that it will come in real handy for me someday. :-) The pictures of Arden are just too cute...in her little hat. Awwww...
Oh my gosh! A genius you are!Thanks for the wonderful pictures too!
OH wonderful! i just was having trouble with holes! thank you thank you thank you!!!!
that pink sock yarn looks sooooo soft and wonderful to knit with!
thank you again for the tutorial! you rock!
I just wanted to let you know that I discovered your technique yesterday and it works like a dream! I can't believe how much better my toe-up socks are coming out than they were before. Thank you so much for the clear tutorial!
Thank you, thank you, thank you. I was ready to give up on short-row socks!!!! I thank you for taking the time and effort to produce the wonderful photos and clear instructions. Onward to beautiful socks!!
please thank marc for taking all those photos! the pictures are priceless, especially when trying to explain something so technical :) i'm going to give this a try on my current socks. i'm ready to start the heel now !
thanks for the tips, I used them and got hole free short row heels!
Great pictures.
Amen! Thank you. I've been struggling with short rows and holes, and this was a great tutorial. Worked like a charm.
My short row heels are now neat and hole-free, thanks to you!
Post a Comment
<< Home